- tar파일 다운로드 및 압축 풀기
sudo wget http://www.sonatype.org/downloads/nexus-latest-bundle.tar.gz
sudo tar -xvzf nexus-latest-bundle.tar.gz
- bin 디렉토리 nexus 실행파일 /etc/init.d로 이동 및 수정
sudo cp /srv/service/nexus/bin/nexus /etc/init.d/
sudo vi /etc/init.d/nexus
RUN_AS_USER=root <-- 추가 루트로 실행할 수 있도록 처리
- port 변경
: port설정 nexus설치 디렉토리 conf의 nexus.properties의 port값 변경
- security 설정
: http://54.92.56.233:6001/nexus/ 접속 (default ID: admin/admin123)
: 패스워드 수정 및 user 생성
Authentication 설정
jenkins 설치
1. /etc/apt/sources.list 파일에 deb http://pkg.jenkins-ci.org/debian binary/ 추가
2. apt-get update
3. apt-get install jenkins
4. port 설정 - vi /etc/default/jenkins port변경 8088
5. jenkins 실행 - sudo service jenkins start
6. maven 사용의 경우 settings.xml 파일 작성 및 프로젝트 pom.xml 설정
jenkins 설정
1. 계정 관련 설정
- 인터넷 브라우져를 통해서 변경한 port로 http://192....:9000/jenkins로 접속
- 인터넷 브라우져를 통해서 변경한 port로 http://192....:9000/jenkins로 접속
- 왼쪽 메뉴에서 Jenkins 관리 -> Configure Global Security선택

- enable security에 체크

- 사용자의 가입을 허용

- Matrix-based security를 선택 한후, User/group to add 에 admin을 입력하고 Add 버튼 클릭.

- 그러면 matrix에 admin이 추가되는데, 맨 오른쪽에 버튼을 클릭 하면 모든 권한이 체크 된다.

- 적용 후 오른쪽 위에 있는 가입버튼을 통해서 기존에 추가한 admin계정에 대해서 동일한 이름으로 가입을 진행 한다.


2. 플러그인 및 환경 설정
1. Jenkins관리 -> 플러그인 관리 -> 설치가능
필요한 항목의 플러그인을 설치해준다.
GIt Plugin, deploy container 설치를 하고 재시작을 진행한다.


2. 다시 Jenkins관리 -> 시스템 설정으로 들어간다.

JDK 설정을 해준다.

git 설정을 해준다. package로 설치하면 git이란 명령어로 어디서든 실행이 가능하므로 명령어에 git이라고 입력하고 저장해준다.
그외 필요한 부분에 대해서 설정을 처리하고 진행한다.
프로젝트 설정
소스코드 관리 선택 및 설정
bitbucket 이용 Credentials은 패스워드로 처리

build하기 전의 설정 처리
excute shell을 이용하여 기존 디렉토리 삭제 및 액션 추가
"Publish Over SSH"플러그인을 설치하여 ssh접속을 통하여 명령어를 실행

 이로써 프로젝트 설정 완료
jenkins설정을 진행하기 전에 프로젝트에 대한 자동 배포를 위해서
tomcat-docs 와 tomcat-admin 패키지를 설정하고
tomcat-users.xml에 해당 내용을 추가 하도록 한다.
<role rolename="manager-script"/>
<role rolename="manager-gui"/>
<role rolename="admin"/>
<user name="admin" password="tomcat!@#$" roles="admin,manager-gui,manager-
프로젝트 설정
소스코드 관리 선택 및 설정
bitbucket 이용 Credentials은 패스워드로 처리

build하기 전의 설정 처리
excute shell을 이용하여 기존 디렉토리 삭제 및 액션 추가
"Publish Over SSH"플러그인을 설치하여 ssh접속을 통하여 명령어를 실행

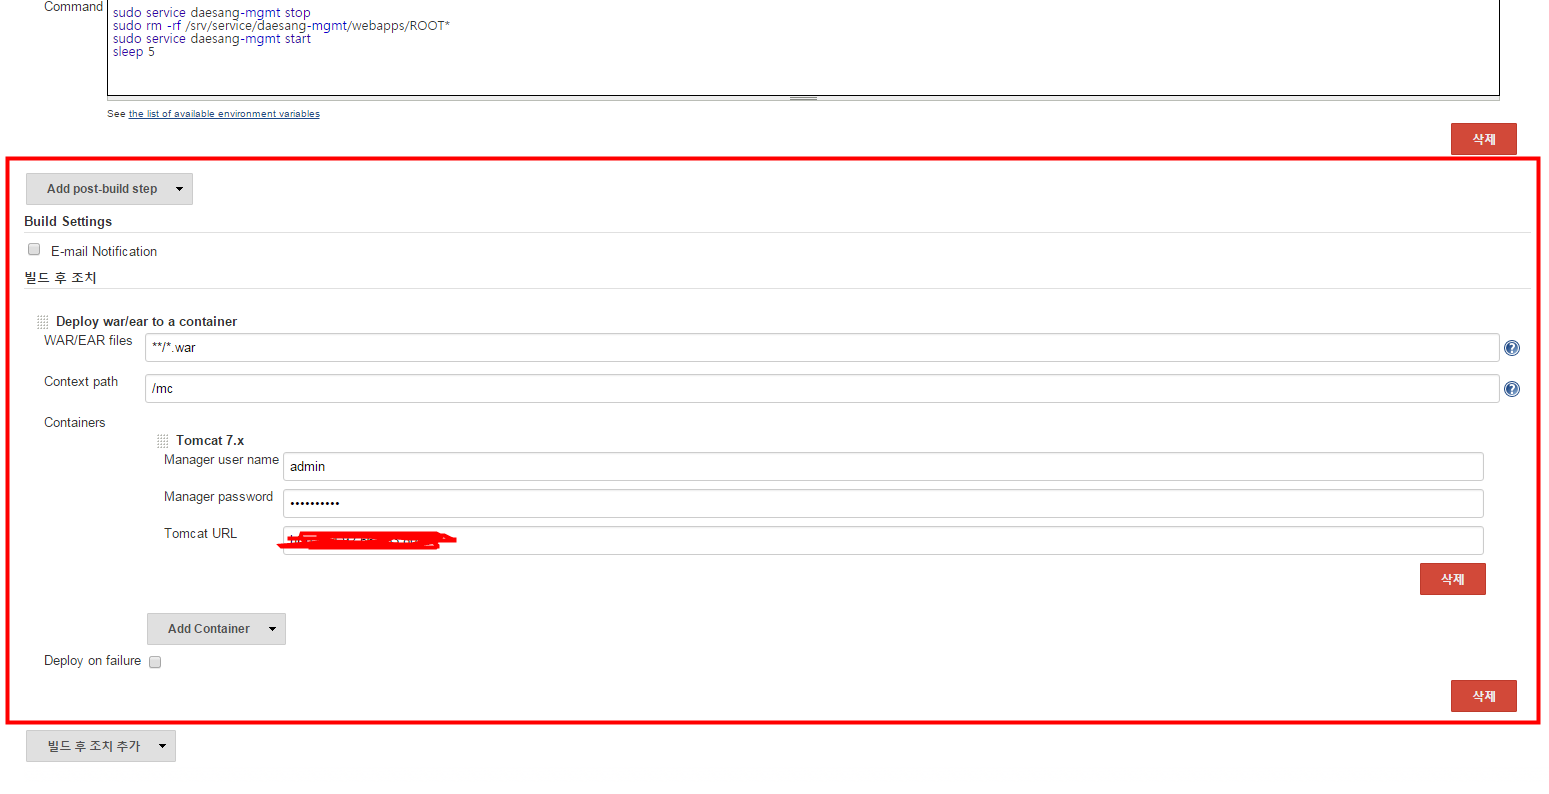
빌드후 deploy처리 설정 추가
jenkins설정을 진행하기 전에 프로젝트에 대한 자동 배포를 위해서
tomcat-docs 와 tomcat-admin 패키지를 설정하고
tomcat-users.xml에 해당 내용을 추가 하도록 한다.
<role rolename="manager-script"/>
<role rolename="manager-gui"/>
<role rolename="admin"/>
<user name="admin" password="tomcat!@#$" roles="admin,manager-gui,manager-
manage모쥴을 사용하기 위한 설정
- conf/Catalina 디렉토리 설정 및 tomcat-users.xml 설정
- work/catalina.policy 및 Catalina 디렉토리 설정
5. settings.xml 및 pom 작성
settings.xml 설정
================================================
<settings>
<servers>
<server>
<id>nexus</id>
<username>nexus</username>
<password>nexus</password>
</server>
</servers>
</settings>
pom.xml
=================================================
<distributionManagement>
<!-- use the following if you're not using a snapshot version. -->
<repository>
<id>nexus</id>
<name>RepositoryProxy</name>
<url>${deploy.nexus.uri}/content/repositories/releases</url>
</repository>
<snapshotRepository>
<id>nexus</id>
<name>RepositoryProxy</name>
<url>${deploy.nexus.uri}/content/repositories/snapshots</url>
</snapshotRepository>
</distributionManagement>
================================================
댓글 없음:
댓글 쓰기