ctrl + p + q
해당 컨테이너를 종료하지 않고 살려놓은 상태로 Host OS로 나올 수 있다.
docker명령어로의 처리는 확인 되지 않아서 현재 상태에서는 모르는 상태이다.
2015년 4월 23일 목요일
2015년 4월 22일 수요일
EhCache 여러 서버 데이타 동기화
RMI를 이용하여 Cache데이타 동기화를 진행할 수 있다.
두가지 방법이 있는데
Multicast방식과 P2P 방식이 있다.
multicast방식: 노드간 캐쉬의 변경사항을 Broadcast를 통해서 서로의 데이타를 Replication처리 한다.
모든 서버의 설정 config가 동일하다.
<cacheManagerPeerProviderFactory
class="net.sf.ehcache.distribution.RMICacheManagerPeerProviderFactory"
properties="peerDiscovery=automatic, multicastGroupAddress=230.0.0.1,
multicastGroupPort=4446, timeToLive=32"/>
P2P방식:동등 계층간 통신망 연결을 통하여 서로 서버간에 데이타를 Replication을 진행한다.
각각의 연결할 서버의 정보를 config데이타로 설정해야 한다.
<cacheManagerPeerProviderFactory
class="net.sf.ehcache.distribution.RMICacheManagerPeerProviderFactory"
properties="peerDiscovery=manual,
rmiUrls=//server2:40001/oc"/>
2015년 4월 21일 화요일
EhCache Spring에서 사용하기 JavaConfig
Context설정
cache.xml
<ehcache xmlns:xsi="http://www.w3.org/2001/XMLSchema-instance"
xsi:noNamespaceSchemaLocation="http://www.ehcache.org/ehcache.xsd"
updateCheck="false" monitoring="autodetect" dynamicConfig="false"
maxBytesLocalHeap="75%" name="debop4j-cache">
<diskStore path="java.io.tmpdir"/>
<cache name="MenuCache"
eternal="true"
overflowToDisk="false"
memoryStoreEvictionPolicy="LRU"
statistics="false"/>
<cache name="CodeCache"
eternal="true"
overflowToDisk="false"
memoryStoreEvictionPolicy="LRU"
statistics="false"/>
</ehcach
LRU(Least Recently Used)는 교체 전략 중의 하나로 최근 사용이 가장 적은 것부터 버리는 방식이다.
실제 cache 설정 코드
package com.lge.apip.config;
import javax.annotation.PostConstruct;
import org.slf4j.Logger;
import org.slf4j.LoggerFactory;
import org.springframework.cache.annotation.EnableCaching;
import org.springframework.cache.ehcache.EhCacheCacheManager;
import org.springframework.cache.ehcache.EhCacheManagerFactoryBean;
import org.springframework.context.annotation.Bean;
import org.springframework.context.annotation.ComponentScan;
import org.springframework.context.annotation.Configuration;
import org.springframework.core.io.ClassPathResource;
@Configuration
@EnableCaching
@ComponentScan(basePackages="com.lge.apip.mgmt")
public class EhcacheContext {
private static final Logger LOGGER = LoggerFactory.getLogger(MyBatisContext.class);
@Bean(name = "ehcache")
public EhCacheManagerFactoryBean ehCacheManagerFactoryBean() {
EhCacheManagerFactoryBean ehCacheManagerFactoryBean = new EhCacheManagerFactoryBean();
ehCacheManagerFactoryBean.setConfigLocation(new ClassPathResource("/conf/cache/ehcache.xml"));
return ehCacheManagerFactoryBean;
}
@Bean(name = "cacheManager")
public EhCacheCacheManager cacheManager() {
return new EhCacheCacheManager(ehCacheManagerFactoryBean().getObject());
}
@PostConstruct
public void postConstruct() {
LOGGER.info("Cache Created");
}
}
<ehcache xmlns:xsi="http://www.w3.org/2001/XMLSchema-instance"
xsi:noNamespaceSchemaLocation="http://www.ehcache.org/ehcache.xsd"
updateCheck="false" monitoring="autodetect" dynamicConfig="false"
maxBytesLocalHeap="75%" name="debop4j-cache">
<diskStore path="java.io.tmpdir"/>
<cache name="MenuCache"
eternal="true"
overflowToDisk="false"
memoryStoreEvictionPolicy="LRU"
statistics="false"/>
<cache name="CodeCache"
eternal="true"
overflowToDisk="false"
memoryStoreEvictionPolicy="LRU"
statistics="false"/>
</ehcach
LRU(Least Recently Used)는 교체 전략 중의 하나로 최근 사용이 가장 적은 것부터 버리는 방식이다.
실제 cache 설정 코드
ServiceImpl.java
/* (non-Javadoc)
* @see com.skp.openplatform.backoffice.ocpo.menu.service.MenuService#getTreeMenuList()
*/
@Override
@Cacheable(value = "MenuCache", key = "#root.target.MENU_TOTAL", condition="#searchRequest.query.size() == 0 && #searchRequest.pageInfo == null")
public List<Menu> getTreeMenuList(SearchRequest searchRequest) {
searchRequest.setData(); //query 데이타 셋팅
List<Menu> menuList = menuMapper.selectTreeMenuList(searchRequest);
List<Menu> newMenuList = new ArrayList<Menu>();
if(menuList != null && menuList.size() > 0) {
long baseMenuId = menuList.get(0).getBaseMenuId();
newMenuList.add(menuList.get(0));
for(int index = 1 ; index < menuList.size() ; index++ ) {
Menu menu = menuList.get(index);
if( baseMenuId == menu.getBaseMenuId() ) {
newMenuList.add(0,menu);
} else {
for( int j = 0 ; j < newMenuList.size() ; j++ ) {
if( menu.getBaseMenuId() == newMenuList.get(j).getOppositeMenuId() ) {
newMenuList.add(j+1, menu);
continue;
}
}
}
}
}
return newMenuList;
}
Caching 컨트롤
conditional 속성과 SpEL 표현식으로 ture나 false 평가식을 만들 수 있다. 해당 표현식이 true면 캐싱하고, false명 캐싱하지 않는다.
@Cacheable(value = "MenuCache", key = "#root.target.MENU_TOTAL", condition="#searchRequest.query.size() == 0 && #searchRequest.pageInfo == null")
아래의 목록은 key와 condition에서 사용할 수 있는 spel 속성 값이다.
@CacheEvict 애노테이션
캐쉬를 삭제 할때 사용한다. 특정 엔트리만 삭제할 수 있고 모든 캐쉬 데이타를 삭제할 수도 있다. Cacheable와 같이 key, condition을 모두 사용할 수 있다.
@CacheEvict(value = "CodeCache", allEntries=true)
allEntries 이 옵션은 캐시 영역을 비워야 할 때 유용하다. 키를 명시해도 적용되지 않기 때문에 무시한다.
Caching 컨트롤
conditional 속성과 SpEL 표현식으로 ture나 false 평가식을 만들 수 있다. 해당 표현식이 true면 캐싱하고, false명 캐싱하지 않는다.
@Cacheable(value = "MenuCache", key = "#root.target.MENU_TOTAL", condition="#searchRequest.query.size() == 0 && #searchRequest.pageInfo == null")
아래의 목록은 key와 condition에서 사용할 수 있는 spel 속성 값이다.
표 28.1. Cache SpEL available metadata
| 이름 | 위치 | 설명 | 예제 |
| methodName | root 객체 | 실행될 메서드 이름 | #root.methodName |
| method | root 객체 | 실행될 메서드 | #root.method.name |
| target | root 객체 | 실행될 타겟 객체 | #root.target |
| targetClass | root 객체 | 실행될 타겟 클래스 | #root.targetClass |
| params | root 객체 | 타겟을 실행할 때 사용하는 인자 목록 | #root.params[0] |
| cacahes | root 객체 | 현재 메서드 실행할 때 사용하는 캐시 컬렉션 | #root.cacahes[0].name |
| parameter name | evalucation 컨텍스트 | 메서드 매개변수 이름 | iban 또는 p0 |
캐쉬를 삭제 할때 사용한다. 특정 엔트리만 삭제할 수 있고 모든 캐쉬 데이타를 삭제할 수도 있다. Cacheable와 같이 key, condition을 모두 사용할 수 있다.
@CacheEvict(value = "CodeCache", allEntries=true)
allEntries 이 옵션은 캐시 영역을 비워야 할 때 유용하다. 키를 명시해도 적용되지 않기 때문에 무시한다.
2015년 4월 20일 월요일
docker 관련 유용한 tools
Panamax
docker의 image나 template를 Web UI에서 손 쉽게 처리 할 수 있도록 처리해주는 tool
컨테이너를 실행하거나 종료 여러개의 컨테이너 처리를 쉽게 할 수 있다.
Shipyard
multi-host, Docker cluster management
docker를 cluster환경을 구성할 수 있도록 처리해주는 tool
Docker Swarm
여러대의 Docker host를 cluster로 묶어서 single docker host 처럼 사용할 수 있게 해주는 tool.

docker의 image나 template를 Web UI에서 손 쉽게 처리 할 수 있도록 처리해주는 tool
컨테이너를 실행하거나 종료 여러개의 컨테이너 처리를 쉽게 할 수 있다.
Shipyard
multi-host, Docker cluster management
docker를 cluster환경을 구성할 수 있도록 처리해주는 tool
Docker Swarm
여러대의 Docker host를 cluster로 묶어서 single docker host 처럼 사용할 수 있게 해주는 tool.
Docker PaaS
Although Docker was a technology originally built out of a PaaS (DotCloud), there have been multiple attempts to create micro-PaaS'es out of Docker.
1. Flynn – https://github.com/flynn 961 stars, 24 forks in Mar 2014 "Flynn is like Sinatra where Cloud Foundry is like Rails"
Flynn is one of the most anticipated Docker PaaS'es right now. With nearly 1,000 stars and dozens of forks, this open-source Docker project has not even been released yet. With a
git push deployment to Docker, it is easy to see why there is so much anticipation. Flynn simplifies deploying and maintaining applications. Instead of using complex configuration management systems, Flynn allows self-serve management of containerized deployments, making life easier for ops and developers. Flynn is also different than the other projects on this list because they are a sponsored open-source project. With 14+ sponsors having donated over $80,000, this project is definitely one to watch.
2. Deis – https://github.com/opdemand/deis 1,341 stars, 120 forks in Mar 2014"Your PaaS. Your Rules."
With over 1,300 stars and over 120 forks, Deis is more established than Flynn and also has a
git push deploy style. Deis leverages Chef, Docker, Django, Celery, Heroku Buildpacks, and Slugbuilder to do its magic. Deis comes with out-of-the-box support for Ruby, Python, Node.js, Java, Clojure, Scala, Play, PHP, Perl, Dart and Go. Also, Deis can deploy anything using Heroku Buildpacks, Docker images or Chef recipes. Deis can be deployed on any system including every public cloud, private cloud or bare metal. Deis currently supports automated provisioning on EC2, Rackspace and Digital Ocean. In an upcoming blog post, we will compare Deis and Flynn in more detail.
3. Dokku – https://github.com/progrium/dokku 4,806 stars, 384 forks in Mar 2014 "Docker powered mini-Heroku in around 100 lines of Bash"
**If you just want the smallest viable
git push to Docker container functionality in the world, take a look at Dokku. From the maker of localtunnel (a super useful utility to reverse-proxy your localhost ports to a public url), this little power-house of an open-source project has the most eye-balls. It is not as feature rich as Deis or Flynn, but it is incredibly easy to install and use on Ubuntu 13 or 12.04 x64.
$ wget -qO- https://raw.github.com/progrium/dokku/v0.2.2/bootstrap.sh | sudo DOKKU_TAG=v0.2.2 bash
Note: Users on 12.04 will need to run
apt-get install -y python-software-properties before bootstrapping stable.Docker Orchestration
4. CoreOS – https://github.com/coreos 2,564 stars, 237 forks in Mar 2014"CoreOS enables warehouse-scale computing on top of a minimal, modern operating system."
**CoreOS is developing best practices for deploying containerized applications to production. It is not a single open-source repository, but rather a collection of many open-source tools that can be used together including
etcd, docker, andsystemd. We have written about generating CoreOS files from Fig files before because getting started with CoreOS can be a daunting experience. The etcdlibrary is used as a universal key/value store to stitch services together and share service credentials across an entire application. Unlike many of the other projects in this list, CoreOS is both an open-source project and a venture backed startup (which is why CoreOS is also listed in our Top 10 Startups Built on Docker post).
5. Fig – https://github.com/orchardup/fig 1,526 stars, 51 forks in Mar 2014"Fast, isolated development environments using Docker"
**I have written a few times about Fig because it is one of my favorite little utilities for Docker (Auto-Loadbalancing Docker with Fig, HAProxy and Serf andBuilding Complex Apps for Docker on CoreOS and Fig). Fig lets you write a simple
fig.yml file that lists all the Docker containers your app needs and how they should link together. Once you write the fig.yml you just fig up -d and your app will be up and running. This blog is managed by fig right now.
6. Serf – https://github.com/hashicorp/serf 1,652 stars, 91 forks in Mar 2014 "A decentralized solution for service discovery and orchestration that is lightweight, highly available, and fault tolerant"
**Although Serf is not Docker specific, it is like jelly to Docker's peanut butter. Serf is one of my favorite new open-source projects and came from the guys who make Vagrant. I wrote about it a few weeks ago in Decentralizing Docker: How to Use Serf with Docker so you can get a great insight into how to use it with Docker there, but essentially it is a hammer you can use where CoreOS and etcd is a nail-gun. Serf is also really easy to use outside of Docker and can be used in a lot of different ways where etcd and CoreOS are pretty specific tools that aren't nearly as flexible (though definitely very powerful).
CI/CD
7. Drone – https://github.com/drone/drone 2,516 stars, 133 forks in Mar 2014"A Continuous Integration platform built on Docker"
Drone (another project that is both an open source project and a startup) gives you a simple go binary, distributed in a debian file, that gives you a full CI/CD pipeline hooked natively into Docker. Cool, right? Your code never needs to leave your laptop or your company's network to be tested, which is a huge deal for big company developers who have policies that prevent them from using public hosted services like GitHub and Travis. The other cool part of Drone is that you can deploy the fully tested containers into production and be assured that the exact same environment is used in both locations. Finally, Drone lets you build custom Docker containers with whatever custom binaries and configuration you need, which is way more flexible than most CI platforms today.
UI
8. Shipyard – https://github.com/shipyard/shipyard 1,443 stars, 96 forks in Mar 2014 "Open Source Docker Management"
Shipyard gives you the ability to manage Docker resources including containers, images, hosts, and more all from a single management interface including: Multi-Host Support, Container Metrics, and a RESTful API. I love this part, to deploy Shipyard, you just run:
$ docker run -i -t -v /var/run/docker.sock:/docker.sock shipyard/deploy setup
Then you should be able to login to http://localhost:8000 and get the pretty UI (more QuickStart docs available). Slick! Being able to visually see all your containers is killer and Shipyard is a great way to do that.
Orchestration
9. Kubernetes – https://github.com/GoogleCloudPlatform/kubernetes 3,598stars, 501 forks in Sept 2014 "Google's Docker Orchestrator"
Kubernetes is an open source implementation of container cluster management. In other words, it is a system for managing containerized applications across multiple hosts, providing basic mechanisms for deployment, maintenance, and scaling of applications. Its APIs are intended to serve as the foundation for an open ecosystem of tools, automation systems, and higher-level API layers.
10. Panamax – https://github.com/centurylinklabs/panamax-ui 510 stars, 43forks in Sept 2014 "Docker Management for Humans"
Panamax is a containerized app creator with an open-source app marketplace hosted in GitHub. Panamax provides a friendly interface for users of Docker, Fleet & CoreOS. With Panamax, you can easily create, share and deploy any containerized app no matter how complex it might be.
@RequestPart 사용법
@RequestParam POST 데이타 포함된 인자의 이름을 가지고 접근할 수 있다. 일반적인 String 처리에 유용하다.
하지만 @RequestBody이 HttpMessageConverter의 도움을 받아 멀티파트가 아닌 요청의 바디를 대상 객체로 변환하는 것과 아주 유사하게 요청 바디에서 JSON 포맷의 데이터에서 초기화된 강타입의 객체를 받는 것을 선호할 것이다.
이때 사용 하는 것이 @RequestPart 이다 .
@RequestPart는 멀티파트의 'Content-Type' 헤더를 기억하도록HttpMessageConverter로 전달된 멀티파트의 내용을 가질 수 있게 한다.
@RequestPart는 'Content-Type' 헤더에 기반해서 JSON 컨텐츠로 읽어서 MappingJacksonHttpMessageConverter로 변환한다.
해당 Content-type에 걸맞는 convert를 찾아준다.
따라서 json/xml과 같이 모델 맵핑이 필요한 경우 @RequestPart가 유용하다.
2015년 4월 3일 금요일
RabbitMQ+spring RabbitTemplate사용시 유의점
RabbitTemplate에서 convertAndSend 메쏘드를 사용할 경우 Message class에 Payload에 데이타를 추가시 byte[] 과 String과 Serializeable 클래스에 대해서 처리가 된다.
그외의 클래스의 경우 null처리가 된다.
SimpleMessageConverter 클래스 참고
/**
* Creates an AMQP Message from the provided Object.
*/
@Override
protected Message createMessage(Object object, MessageProperties messageProperties) throws MessageConversionException {
byte[] bytes = null;
if (object instanceof byte[]) {
bytes = (byte[]) object;
messageProperties.setContentType(MessageProperties.CONTENT_TYPE_BYTES);
}
else if (object instanceof String) {
try {
bytes = ((String) object).getBytes(this.defaultCharset);
}
catch (UnsupportedEncodingException e) {
throw new MessageConversionException(
"failed to convert to Message content", e);
}
messageProperties.setContentType(MessageProperties.CONTENT_TYPE_TEXT_PLAIN);
messageProperties.setContentEncoding(this.defaultCharset);
}
else if (object instanceof Serializable) {
try {
bytes = SerializationUtils.serialize(object);
} catch (IllegalArgumentException e) {
throw new MessageConversionException(
"failed to convert to serialized Message content", e);
}
messageProperties.setContentType(MessageProperties.CONTENT_TYPE_SERIALIZED_OBJECT);
}
if (bytes != null) {
messageProperties.setContentLength(bytes.length);
}
return new Message(bytes, messageProperties);
}
하지만 MessageConverter를 이용한다면 확장이 가능하다
http://docs.spring.io/spring-amqp/reference/html/amqp.html 의
3.6 Message Converters 를 참고
나의 경우 Jackson2JsonMessageConverter를 이용하였다.
============================================================
rabbitTemplate.setMessageConverter(Jackson2JsonMessageConverter());
@Bean
public Jackson2JsonMessageConverter Jackson2JsonMessageConverter(){
return new Jackson2JsonMessageConverter();
}
==============================================================
2015년 4월 2일 목요일
java toBytes toObject 구현
public byte[] getBytes (Object data)
{
byte[] bytes = null;
ByteArrayOutputStream bos = new ByteArrayOutputStream();
try {
ObjectOutputStream oos = new ObjectOutputStream(bos);
oos.writeObject(data);
oos.flush();
oos.close();
bos.close();
bytes = bos.toByteArray ();
}
catch (IOException ex) {
//TODO: Handle the exception
}
return bytes;
}
public RestData toObject (byte[] bytes)
{
RestData obj = null;
try {
ByteArrayInputStream bis = new ByteArrayInputStream (bytes);
ObjectInputStream ois = new ObjectInputStream (bis);
obj = (RestData)ois.readObject();
}
catch (IOException ex) {
//TODO: Handle the exception
}
catch (ClassNotFoundException ex) {
//TODO: Handle the exception
}
return obj;
}
{
byte[] bytes = null;
ByteArrayOutputStream bos = new ByteArrayOutputStream();
try {
ObjectOutputStream oos = new ObjectOutputStream(bos);
oos.writeObject(data);
oos.flush();
oos.close();
bos.close();
bytes = bos.toByteArray ();
}
catch (IOException ex) {
//TODO: Handle the exception
}
return bytes;
}
public RestData toObject (byte[] bytes)
{
RestData obj = null;
try {
ByteArrayInputStream bis = new ByteArrayInputStream (bytes);
ObjectInputStream ois = new ObjectInputStream (bis);
obj = (RestData)ois.readObject();
}
catch (IOException ex) {
//TODO: Handle the exception
}
catch (ClassNotFoundException ex) {
//TODO: Handle the exception
}
return obj;
}
JWT 문제점
JWT의 문제점
사용이 쉽고, 서버의 개발 부담을 덜어줄 수 있다는 여러가지 장점을 가지고 있으나, 그만큼 또 단점도 가지고 있다.
길이
Claim에 넣는 데이터가 많아질 수 록, JWT 토큰의 길이가 길어진다. API 호출등에 사용할 시에,매 호출마다 헤더에 붙어서 가야하기 때문에, 길이가 길다는 것은 그만큼 네트워크 대역폭 낭비가 심하다는 의미이다.
한번 발급된 토큰은 값을 수정하거나 폐기가 불가
JWT는 토큰 내에 모든 정보를 다 가지고 있기 때문에, 한번 발급된 토큰에 대한 변경은 서버에서는 더 이상 불가능하다. 예를 들어 토큰을 잘못 발행해서 삭제하고 싶더라도, Signature만 맞으면 맞는 토큰으로 인식을 하기 때문에, 서버에서는 한번 발급된 토큰의 정보를 바꾸는 일등이 불가능하다.
그래서 만약에 JWT를 쓴다면, Expire time을 꼭 명시적으로 두도록 하고, refresh token등을 이용해서, 중간중간 토큰을 재발행하도록 해야 한다. (하루 단위 정도?)
보안
JWT는 기본적으로 Claim에 대한 정보를 암호화 하지 않는다. 단순히 BASE64로 인코딩만 하기 때문에, 중간에 패킷을 가로채거나, 기타 방법으로 토큰을 취득했으면 토큰 내부 정보를 통해서 사용자 정보가 누출 될 수 있는 가능성이 있다. 특히 자바스크립트 기반의 웹 클라이언트의 경우 브라우져상의 디버거등을 통해서 토큰이 노출될 가능성이 높다.
그래서, 이를 보완하는 방법으로는 토큰 자체를 암호화 하는 방법이 있다. JSON을 암호화 하기 위한 스펙으로는 JWE(JSON Web Encryption)
참조: 조대협 블로그
http://bcho.tistory.com/1000
2015년 4월 1일 수요일
JWT 개념소개
JWT(JSON Web Token)을 이용한 API 인증 - #1 개념 소개
REST API에 대한 보안과 인증이 화두가 되면서 많이 언급되는 것이 OAuth인데, 근래에 들어서 화두가 되고 있는 것이 JWT (JSON Web Token)이라는 표준이다.
Claim기반 토큰의 개념
OAuth에 의해서 발급되는 access_token은 random string으로 토큰 자체에는 특별한 정보를 가지고 있지 않는 일반적인 스트링 형태 이다. 아래는 페이스북에서 발급된 access_token의 형태로 일반적인 문자열 형태임을 확인할 수 있다.
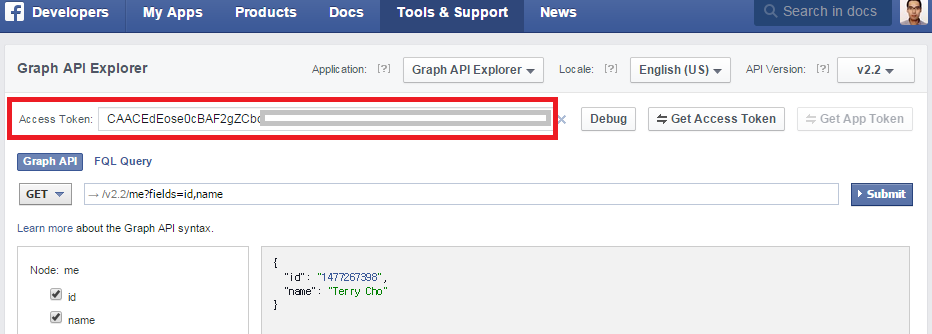
<그림1. Facebook의 Oauth에서 사용하는 일반적인 스트링 기반 토큰 예제>
API나 서비스를 제공하는 서버 입장에서 그 access_token을 통해서 사용자에 연관된 권한(예를 들어 scope같은 것)을 식별한 뒤 권한을 허용해주는 구조이다.
즉 서비스를 제공하는 입장에서는 토큰을 가지고 그 토큰과 연관된 정보를 서버쪽에서 찾아야 한다. (사용자 ID나 권한등).
JWT는 Claim 기반이라는 방식을 사용하는데, Claim이라는 사용자에 대한 프로퍼티나 속성을 이야기 한다. 토큰자체가 정보를 가지고 있는 방식인데, JWT는 이 Claim을 JSON을 이용해서 정의한다.
다음은 Claim을 JSON으로 서술한 예이다.이 JSON 자체를 토큰으로 사용하는 것이 Claim 기반의 토큰 방식이다.
{"id":"terry","role":["admin","user"],"company":"pepsi"}
<코드 1. JSON으로 Claim을 기술한 토큰의 형태 >
자 그렇다면, 이러한 Claim 방식의 토큰은 무엇이 좋을까? 이 토큰을 이용해서 요청을 받는 서버나 서비스 입장에서는 이 서비스를 호출한 사용자에 대한 추가 정보는 이미 토큰안에 다 들어가 있기 때문에 다른 곳에서 가져올 필요가 없다는 것이다.
“사용자 관리” 라는 API 서비스가 있다고 가정하다.
이 API는 “관리자(admin)” 권한을 가지고 있는 사용자만이 접근이 가능하며, “관리자” 권한을 가지고 있는 사용자는 그 관리자가 속해 있는 “회사(company)”의 사용자 정보만 관리할 수 있다. 라고 정의하자
이 시나리오에 대해서 일반적인 스트링 기반의 토큰과 JWT와 같은 Claim 기반의 토큰이 어떤 차이를 가질 수 있는 지 알아보도록 하자.
OAuth 토큰의 경우
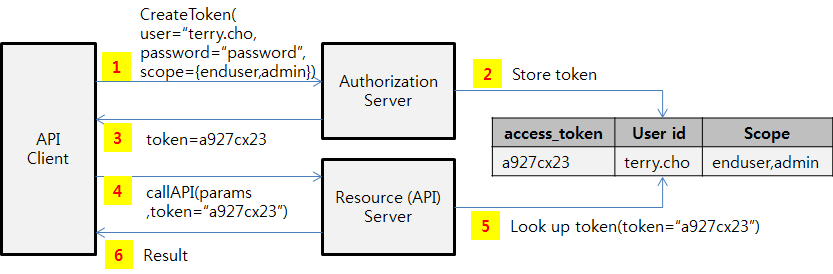
<그림 2. String 토큰에 의한 API 권한 인증 흐름>
1. API 클라이언트가 Authorization Server (토큰 발급서버)로 토큰을 요청한다.
이때, 토큰 발급을 요청하는 사용자의 계정과 비밀번호를 넘기고, 이와 함께 토큰의 권한(용도)을 요청한다. 여기서는 일반 사용자 권한(enduser)과 관리자 권한(admin)을 같이 요청하였다.
2. 토큰 생성 요청을 받은 Authorization Server는 사용자 계정을 확인한 후, 이 사용자에게 요청된 권한을 부여해도 되는지 계정 시스템등에 물어본 후, 사용자에게 해당 토큰을 발급이 가능하면 토큰을 발급하고, 토큰에 대한 정보를 내부(토큰 저장소)에 저장해놓는다.
3. 이렇게 생성된 토큰은 API 클라이언트로 저장된다.
4. API 클라이언트는 API를 호출할때 이 토큰을 이용해서 Resource Server(API 서버)에 있는 API를 호출한다.
5. 이때 호출되는 API는 관리자 권한을 가지고 있어야 사용할 수 있기 때문에, Resource Server가 토큰 저장소에서 토큰에 관련된 사용자 계정, 권한 등의 정보를 가지고 온다. 이 토큰에 (관리자)admin 권한이 부여되어 있기 때문에, API 호출을 허용한다. 위에 정의한 시나리오에서는 그 사용자가 속한 “회사”의 사용자 정보만 조회할 수 있다. 라는 전제 조건을 가지고 있기 때문에, API 서버는 추가로 사용자 데이타 베이스에서 이 사용자가 속한 “회사” 정보를 찾아와야한다.
6. API서버는 응답을 보낸다.
JWT와 같은 Claim 기반의 토큰 흐름을 보자
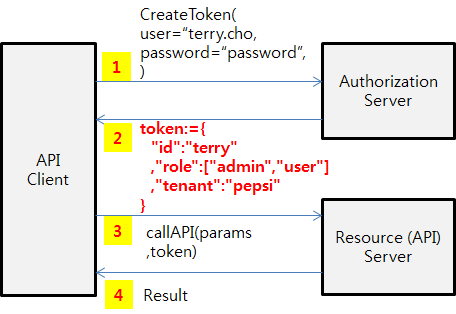
<그림 3. Claim 기반의 토큰을 이용한 API 권한 인증 흐름 >
1. 토큰을 생성 요청하는 방식은 동일하다. 마찬가지로 사용자를 인증한다음에, 토큰을 생성한다.
2. 다른 점은 생성된 토큰에 관련된 정보를 별도로 저장하지 않는다는 것이다. 토큰에 연관되는 사용자 정보나 권한등을 토큰 자체에 넣어서 저장한다.
3. API를 호출하는 방식도 동일하다.
4. Resource Server (API 서버)는 토큰 내에 들어 있는 사용자 정보를 가지고 권한 인가 처리를 하고 결과를 리턴한다.
결과적으로 차이점은 토큰을 생성하는 단계에서는 생성된 토큰을 별도로 서버에서 유지할 필요가 없으며
토큰을 사용하는 API 서버 입장에서는 API 요청을 검증하기 위해서 토큰을 가지고 사용자 정보를 별도로 계정 시스템등에서 조회할 필요가 없다는 것이다.
참고 : 다른 Claim 기반 토큰은?그러면 이러한 Claim 기반의 토큰이 JSON이 처음일까? 이미 이전에, XML기반의 SAML 2.0이 이와 비슷한 개념을 가지고 있다. Assertion이라는 개념으로 XML안에 이러한 Claim 정보를 넣어서 넘길 수 있었으나, 문제점은 전체적인 사이즈가 너무 크고, 구조가 복잡하여 쉽게 접근이 어려웠다. 더군다가 크기가 크기 때문에 API와 같이 자주 호출해야 하는 경우에는 HTTP 헤더등에 실어서 보내기가 어렵고, 파싱에 대한 오버해드가 크기 때문에 적절하지 않았다. (주로 다른 사이트나 시스템간의 SSO에서 상호 사용자 인증등을 위해서 사용된다. 무겁기는 하지만 표준화가 잘되어 있기 때문에 사용자 인증 시나리오에서는 현재에도 많이 사용된다.)JWT는 이JSON Claim을 BASE64로 인코딩하여HTTP Header에 쉽게 넣을 수 있으며, JSON 기반이기 때문에 파싱과 사용이 쉽다.결과적으로 Claim 기반의 토큰은 토큰 자체가 정보를 담음으로써, 토큰을 가지고 서비스나 API 접근을 제어할 때 별도의 작업이 서버에서 필요하지 않으며, 토큰 자체를 서버에서 관리할 필요가 없기 때문에 구현이 상대적으로 단순해진다.
JWT에 대한 소개
Claim 기반의 토큰에 대한 개념을 대략적으로 이해했다면, 그러면 실제로 JWT가 어떻게 구성되는지에 대해서 살펴보도록 하자.
Claim (메세지) 정의
JWT는 Claim을 JSON형태로 표현하는 것인데, JSON은 “\n”등 개행문자가 있기 때문에, REST API 호출시 HTTP Header등에 넣기가 매우 불편하다. 그래서, JWT에서는 이 Claim JSON 문자열을 BASE64 인코딩을 통해서 하나의 문자열로 변환한다.
{
"id":"terry"
,"role":["admin","user"]
,"company":"pepsi"
}
<코드 2. JSON 기반의Claim 예제>
문자열을 BASE64 인코딩 한 결과
ew0KICAiaWQiOiJ0ZXJyeSINCiAgLCJyb2xlIjpbImFkbWluIiwidXNlciJdDQogICwiY29tcGFueSI6InBlcHNpIg0KfQ0K
<코드 3. JSON 기반의 Claim 코드 2를 BASE64 인코딩 한 결과>
변조 방지
위의 Claim 기반의 토큰을 봤으면, 첫번째 들 수 있는 의문이 토큰을 받은 다음에 누군가 토큰을 변조해서 사용한다면 어떻게 막느냐? 이다. 이렇게 메세지가 변조 되지 않았음을 증명하는 것을 무결성(Integrity)라고 하는데, 무결성을 보장하는 방법중 많이 사용되는 방법이 서명(Signature)이나 HMAC 사용하는 방식이다. 즉 원본 메세지에서 해쉬값을 추출한 후, 이를 비밀 키를 이용해서 복호화 시켜서 토큰의 뒤에 붙인다. 이게 HMAC방식인데, 누군가 이 메세지를 변조를 했다면,변조된 메세지에서 생성한 해쉬값과 토큰뒤에 붙어 있는 HMAC값이 다르기 때문에 메세지가 변조되었음을 알 수 있다. 다른 누군가가 메세지를 변조한후에, 새롭게 HMAC값을 만들어내려고 하더라도, HAMC은 앞의 비밀키를 이용해서 복호화 되었기 때문에, 이 비밀키를 알 수 없는 이상 HMAC을 만들어 낼 수 없다.
※ HMAC에 대한 자세한 설명은http://bcho.tistory.com/807 를 참고하기 바란다.
그래서 앞의 JSON 메세지에 대해서 SHA-256이라는 알고리즘을 이용해서 비밀키를 “secret” 이라고 하고, HMAC을 생성하면 결과는 다음과 같다.
i22mRxfSB5gt0rLbtrogxbKj5aZmpYh7lA82HO1Di0E
<코드 4. 코드 2의 JSON기반 Claim에 대해서, SHA1-256으로 생성한 HMAC>
서명 생성 방식
그러면 무결성 보장을 위해서 사용할 수 있는 알고리즘이 SHA1-256 HMAC 뿐일까? 보안요건에 따라서 SHA1-256,384,512. 그리고 공인 인증서 (Ceritification)을 이용한 RS256 등등 다양한 서명 방식을 지원한다. 그렇다면 JWT 토큰이 어떤 방식으로 서명이 되어 있는지는 어떻게 알 수 있을까?
그래서 JWT 토큰의 맨 앞부분에는 서명에 어떤 알고리즘을 사용했는지를 JSON형태로 정의한후, 이 JSON을 다시 BASE64 방식으로 인코딩한 문자열을 붙인다
{"alg":"HS256","typ":"JWT"}
<코드 5. JSON으로 서명 생성 방식은 SHA1-256으로 정의한 예>
eyJhbGciOiJIUzI1NiIsInR5cCI6IkpXVCJ9
<코드 6. 위의 코드 5 JSON 문자열을 BASE64 인코딩한 결과>
전체 메세지 포맷
위에서 설명한, 서명 방식, JSON 기반의 Claim,그리고 서명(Signature)까지 포함된 전체적인 JWT 토큰의 구조를 보면 다음과 같다.
{서명 방식을 정의한 JSON을 BASE64 인코딩}.{JSON Claim을 BASE64 인코딩}.{JSON Claim에 대한 서명}
이를 정리해서 그림으로 서술해 보면 다음과 같다.
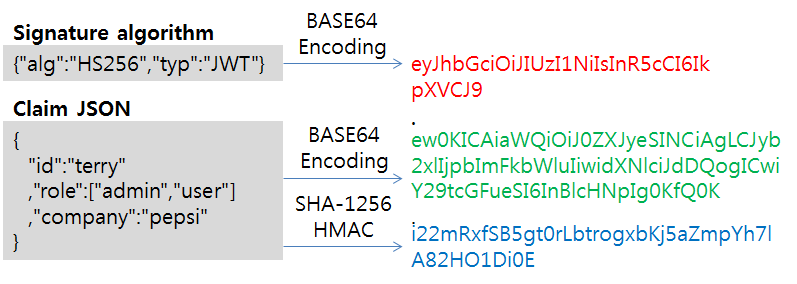
<그림. JWT 토큰 구조>
그리고 결과로 나온, JWT 토큰은
eyJhbGciOiJIUzI1NiIsInR5cCI6IkpXVCJ9.ew0KICAiaWQiOiJ0ZXJyeSINCiAgLCJyb2xlIjpbImFkbWluIiwidXNlciJdDQogICwiY29tcGFueSI6InBlcHNpIg0KfQ0K.i22mRxfSB5gt0rLbtrogxbKj5aZmpYh7lA82HO1Di0E
가 된다.
유용한 사이트
- http://jwt.io/
- 라이브러리 제공 및 decoding기능 제공
유용한 사이트
- http://jwt.io/
- 라이브러리 제공 및 decoding기능 제공
출처: 조대협의 블로그
http://bcho.tistory.com/999
피드 구독하기:
글 (Atom)